![Endpoint Security Software 2026: Enterprise Solutions Compared [Buyer's Guide]](https://bitsfrombytes.com/wp-content/uploads/2026/04/endpoint-security-software-2026-complete-guide-110x110.webp)


Last Updated: November 2025 | Historical Documentation Archive
Translucent PLA filaments represented a unique category within the Bits From Bytes material catalog, combining the ease of printing characteristics of polylactic acid with light-transmitting properties ideal for lighting applications, artistic projects, and designs requiring visual depth. Between 2007 and 2012, these materials enabled creative applications impossible with opaque filaments, from illuminated signs to decorative lampshades.
The translucent range provided designers and makers with the ability to create parts where light interaction was a critical design element, opening new possibilities for functional and aesthetic applications in desktop 3D printing.
Understanding Translucent PLA Materials
Material Composition and Optical Properties
Translucent PLA differs from solid color variants primarily in pigmentation approach. Rather than opaque pigments that block light transmission, translucent materials use carefully controlled additive levels that allow partial light passage while maintaining color tinting. The base PLA polymer remains identical, ensuring consistent mechanical properties across the material range.
Optical Characteristics:
- Light Transmission: 30-60% (varies by color and thickness)
- Clarity: Semi-transparent (objects visible through thin sections)
- Diffusion: Soft light scattering effect (not crystal-clear like acrylic)
- Color Tinting: Subtle hues visible when backlit
Physical Properties:
- Tensile Strength: 50 MPa (equivalent to solid PLA)
- Elongation at Break: 6% (standard for PLA)
- Glass Transition Temperature: 60-65°C
- Density: 1.24 g/cm³
- Layer Adhesion: Excellent (minimal layer visibility in thin sections)
Historical Context: The development of translucent PLA materials reflected growing sophistication in desktop 3D printing applications. Early adopters quickly recognized potential beyond opaque prototypes, creating illuminated displays, artistic installations, and functional parts where light transmission provided both aesthetic and practical benefits.
Available Colors and Visual Effects
Translucent Color Range (2007-2012):
Natural Translucent:
- Color: Barely tinted, nearly colorless
- Appearance: Milky white when unlit, allows maximum light transmission
- Applications: Lighting diffusers, windows, lenses
- Light transmission: 50-60% (highest in range)
Clear Translucent:
- Color: Slight yellowish tint
- Appearance: Most transparent option, closest to colorless
- Applications: Display cases, artistic pieces, light guides
- Light transmission: 55-60%
Red Translucent:
- Color: Ruby-red tint when backlit
- Appearance: Deep red glow with internal illumination
- Applications: Warning indicators, decorative lighting, artistic projects
- Light transmission: 35-45%
Blue Translucent:
- Color: Sapphire-blue tint when backlit
- Appearance: Cool blue glow, popular for electronic projects
- Applications: LED housings, decorative elements, aquatic-themed designs
- Light transmission: 40-50%
Green Translucent:
- Color: Emerald-green tint when backlit
- Appearance: Vibrant green glow
- Applications: Environmental displays, decorative lighting, signage
- Light transmission: 40-50%
Amber/Yellow Translucent:
- Color: Warm amber-orange tint
- Appearance: Warm glow reminiscent of vintage lighting
- Applications: Lampshades, retro designs, warm accent lighting
- Light transmission: 45-55%
Each color maintained consistent printing characteristics while offering distinct visual effects when illuminated, enabling designers to select materials matching project aesthetic requirements.
Technical Specifications
Print Parameters (Optimal Settings)
Extrusion Temperature:
- Minimum: 190°C
- Optimal: 200-210°C
- Maximum: 220°C
- Note: Lower end prevents yellowing, higher end improves layer bonding
Bed Temperature:
- Unheated bed: Acceptable for small prints
- Heated bed optimal: 50-60°C
- Maximum: 70°C
- Adhesion: Blue painter’s tape or PEI sheet recommended
Print Speed:
- First Layer: 20-30mm/s (ensures adhesion)
- Perimeters: 40-60mm/s
- Infill: 60-80mm/s
- Travel: 150-200mm/s
Cooling:
- Part Cooling: Essential for translucent PLA
- Fan Speed: 50-100% (higher improves clarity)
- Exception: First 2-3 layers (minimal cooling for adhesion)
- Effect: Proper cooling maximizes transparency and minimizes cloudiness
Retraction:
- Distance: 1-3mm (direct drive) / 3-5mm (Bowden)
- Speed: 40-60mm/s
- Purpose: Minimize stringing (more visible on translucent materials)
Layer Height and Clarity Optimization
Layer Height Impact on Transparency:
0.1mm Layers:
- Transparency: Maximum (minimal layer line visibility)
- Print time: Longest (3-4x standard)
- Applications: Display pieces, artistic projects, maximum clarity
- Trade-off: Extremely slow but stunning results
0.15mm Layers:
- Transparency: Excellent (good balance)
- Print time: Moderate
- Applications: Most projects requiring good transparency
- Recommended: Best balance of quality and speed
0.2mm Layers:
- Transparency: Good (standard quality)
- Print time: Standard
- Applications: Functional parts, rapid prototyping
- Note: Layer lines slightly more visible but acceptable
0.3mm Layers:
- Transparency: Reduced (layer lines clearly visible)
- Print time: Fastest
- Applications: Structural components where transparency secondary
- Trade-off: Speed over appearance
Key Principle: Thinner layers create smoother internal light refraction, reducing scattering and improving overall transparency. For maximum clarity, 0.1-0.15mm layers are recommended despite increased print time.
Environmental Requirements
Ambient Temperature:
- Optimal: 20-25°C (68-77°F)
- Acceptable: 18-28°C (64-82°F)
- Note: PLA is less temperature-sensitive than ABS
Humidity:
- Storage: Below 30% relative humidity
- Printing environment: Below 60% RH
- Hygroscopic: PLA absorbs moisture, causing brittleness and surface defects
Ventilation:
- Requirements: Minimal (PLA produces sweet-smelling fumes, generally considered safe)
- Recommendation: General room ventilation sufficient
- Advantage: Unlike ABS, no specialized fume extraction required
Light Exposure:
- Storage: Avoid direct sunlight (UV degrades PLA over time)
- Printing: Normal indoor lighting acceptable
- Finished parts: UV protection coating recommended for outdoor use
Applications and Design Considerations
Lighting Applications
LED Housings and Diffusers:
Translucent PLA excelled in creating custom LED enclosures and light diffusers, providing even illumination while concealing individual LED hotspots. The material’s light-scattering properties distributed point sources into uniform glows.
Design Guidelines:
- Wall thickness: 1-3mm for optimal diffusion
- Infill: 0-20% (hollow or minimal infill maximizes light transmission)
- Perimeters: 2-3 walls sufficient for structural integrity
- LED placement: 5-10mm from material surface for even distribution
Popular Projects:
- Custom lamp shades for desk lamps
- LED strip diffusers for indirect lighting
- Photography light modifiers
- Backlit signs and displays
Color Selection:
- Natural/Clear: Maximum brightness, neutral color temperature
- Amber: Warm glow, vintage aesthetic
- Blue: Cool accent lighting, electronic projects
- Red: Warning indicators, decorative elements
Decorative and Artistic Applications
Artistic Installations:
The visual depth created by translucent PLA’s semi-transparent nature enabled artists to create pieces with internal complexity visible from multiple angles. Layer lines became design features rather than defects, creating subtle texture and visual interest.
Techniques:
- Variable wall thickness for controlled light transmission
- Strategic infill patterns visible through translucent walls
- Multi-color translucent layering for depth effects
- Integration with embedded lighting for dramatic reveals
Successful Project Types:
- Decorative vases and containers
- Artistic sculptures with internal structure
- Holiday ornaments and decorations
- Architectural models with illuminated interiors
Functional Applications
Display and Packaging:
Translucent PLA provided cost-effective custom packaging and display solutions where product visibility was essential while maintaining protection.
Applications:
- Protective cases for collectibles (viewing without removal)
- Product display stands with integrated lighting
- Sample containers for material displays
- Trade show demonstration models
Engineering Applications:
Despite aesthetic focus, translucent PLA maintained full mechanical properties of standard PLA, making it suitable for functional parts.
Use Cases:
- Fluid level indicators (visual inspection of contents)
- Light pipe designs for remote LED placement
- Protective covers for electronic displays
- Educational models showing internal mechanisms
Printing Best Practices
Maximizing Transparency
Key Factors Affecting Clarity:
1. Layer Adhesion: Poor layer bonding creates air gaps that scatter light, reducing transparency. Solutions include:
- Increase nozzle temperature by 5-10°C for better flow
- Reduce print speed for perimeters (40mm/s optimal)
- Ensure proper first layer squish for foundation
- Use 100% infill for solid transparent sections
2. Cooling Strategy: Rapid cooling from optimal temperature produces clearest results:
- Enable part cooling fan immediately after first layer
- Use 100% fan speed for small features and overhangs
- Maintain 80-100% fan for standard printing
- Consider additional external fan for large prints
3. Print Orientation: Minimize layer count in viewing direction:
- Orient parts so fewest layers between light source and observer
- Vertical walls perpendicular to bed transmit light best
- Horizontal surfaces show layer lines most prominently
4. Nozzle Temperature Optimization: Too hot: Material yellows, reducing clarity Too cold: Poor layer bonding creates scattering Sweet spot: 205-210°C for most translucent PLA
Preventing Common Defects
Stringing (Web-like Artifacts):
Translucent materials show stringing more prominently than opaque filaments due to light scattering through fine threads.
Solutions:
- Optimize retraction: Start at 3mm, adjust in 0.5mm increments
- Reduce nozzle temperature by 5°C if stringing severe
- Increase retraction speed to 60mm/s
- Enable “Z-hop” for travel moves (0.2mm)
- Dry filament thoroughly before printing
Cloudiness or Haze:
Cloudiness results from microscopic air gaps and inconsistent cooling.
Solutions:
- Increase extrusion temperature for better flow (210°C)
- Maximize part cooling fan speed (100%)
- Reduce print speed for perimeters (40-50mm/s)
- Use lower layer heights (0.1-0.15mm)
- Ensure filament is completely dry
Layer Line Visibility:
While some layer texture is inherent to FDM printing, visibility can be minimized.
Solutions:
- Use thinnest practical layer height (0.1mm for display pieces)
- Orient parts to minimize layers perpendicular to viewing angle
- Post-process with sanding and polishing
- Apply thin clear coat for smoother surface
Yellowing or Discoloration:
PLA can yellow with excessive heat during printing or post-printing UV exposure.
Solutions:
- Avoid temperatures above 215°C during printing
- Store printed parts away from direct sunlight
- Apply UV-protective clear coat for outdoor use
- Use lowest effective nozzle temperature (200-205°C)
Post-Processing Techniques
Sanding and Polishing
Progressive Sanding Method:
Sanding translucent PLA creates frosted appearance initially, but progressive polishing can restore clarity:
Step 1: Coarse Sanding (120-220 grit)
- Purpose: Remove major layer lines and surface defects
- Technique: Sand with water to prevent clogging
- Duration: 3-5 minutes per surface
- Result: Completely frosted, uniform surface
Step 2: Fine Sanding (400-600 grit)
- Purpose: Smooth surface texture
- Technique: Wet sand in circular motions
- Duration: 5-10 minutes per surface
- Result: Smoother frosted appearance
Step 3: Ultra-Fine Sanding (800-1200 grit)
- Purpose: Prepare for polishing
- Technique: Wet sand with minimal pressure
- Duration: 5-10 minutes per surface
- Result: Very smooth, less frosted
Step 4: Polishing (2000+ grit or polishing compound)
- Purpose: Restore clarity
- Technique: Use plastic polishing compound and soft cloth
- Duration: 10-15 minutes with buffing
- Result: Clear, glossy surface approaching injection-molded clarity
Professional Results: Well-executed sanding and polishing can achieve 80-90% of injection-molded clarity, though significant time investment required.
Clear Coating
Purpose and Benefits:
Clear coating translucent PLA provides:
- UV protection preventing yellowing
- Smoothed surface improving light transmission
- Enhanced scratch resistance
- Professional glossy or matte finish options
Application Methods:
Spray Clear Coat:
- Product: Automotive clear coat or acrylic sealer
- Technique: Multiple thin coats (3-5 layers)
- Drying: 10-15 minutes between coats
- Final cure: 24 hours before handling
- Result: Professional smooth finish, minimal layer line visibility
Brush-On Epoxy:
- Product: Clear two-part epoxy resin
- Technique: Thin coats applied with foam brush
- Self-leveling: Creates glass-like surface
- Cure time: 24-48 hours for full hardness
- Result: Maximum clarity and durability
Dip Coating:
- Product: Diluted clear coat or resin
- Technique: Suspend part, dip, allow excess to drip
- Advantages: Even coating, no brush marks
- Challenges: Requires suspension fixture, cleanup
- Result: Uniform coating, professional appearance
Advanced Techniques
Annealing for Clarity:
Controlled heating can improve clarity by allowing polymer chains to relax and reducing internal stresses that scatter light.
Process:
- Preheat oven to 60°C (140°F) – below PLA glass transition
- Place part on non-stick surface or suspended
- Heat for 15-30 minutes
- Cool slowly to room temperature (2-3 hours)
- Caution: Part may slightly deform; use support structures
Results:
- Improved clarity from stress relief
- Slight increase in brittleness
- Minor dimensional changes possible (0.1-0.3%)
Internal Illumination Integration:
For maximum effect, translucent PLA parts can be designed with integrated lighting:
LED Strip Integration:
- Design channel or cavity for LED strips
- Use 1-2mm wall thickness adjacent to LEDs
- Include wire routing and power supply accommodation
- Test with LEDs before finalizing design
Individual LED Mounting:
- Create recesses sized for LED package
- Position LEDs 5-10mm from translucent walls
- Use reflective surfaces to direct light
- Consider heat dissipation for high-power LEDs
Material Advantages and Limitations
Advantages Over Opaque PLA
Visual Interest: Translucent materials create depth and visual complexity impossible with solid colors. Internal structures, infill patterns, and layer stacking become visible design elements.
Lighting Applications: Unmatched for creating custom lighting solutions, diffusers, and illuminated displays at desktop 3D printer scale.
Aesthetic Versatility: Appearance changes dramatically with and without backlighting, creating dual-purpose designs effective in multiple contexts.
Material Inspection: Ability to see through thin sections enables visual verification of internal features, trapped supports, or material defects during post-processing.
Limitations and Challenges
Layer Line Visibility: Layer lines scatter light more noticeably than on opaque materials. Requires thinner layers or post-processing for premium results.
Stringing Appearance: Fine plastic threads from insufficient retraction more visible when light passes through material.
Color Consistency: Batch-to-batch variation in pigment concentration can affect exact color tint and transmission percentage.
UV Sensitivity: PLA degrades with prolonged UV exposure, causing yellowing and brittleness. Not suitable for outdoor use without UV-protective coating.
Mechanical Properties: Identical to standard PLA (both advantages and limitations):
- Brittle compared to ABS (lower impact resistance)
- Heat sensitive (softens at 60°C, unsuitable for hot environments)
- Rigid with limited flexibility
Post-Processing Time: Achieving maximum clarity requires significant sanding and polishing investment compared to opaque materials where layer lines less critical.
Comparison with Other Translucent Materials
Translucent PLA vs Translucent ABS
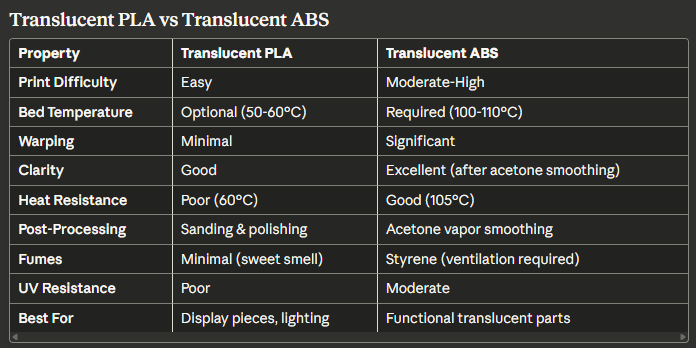
Decision Factors:
- Choose Translucent PLA: Ease of printing, display applications, quick prototypes
- Choose Translucent ABS: Maximum clarity after acetone smoothing, heat resistance needed
Translucent PLA vs Clear PETG
PETG (Polyethylene Terephthalate Glycol) represents modern alternative to PLA with improved properties:
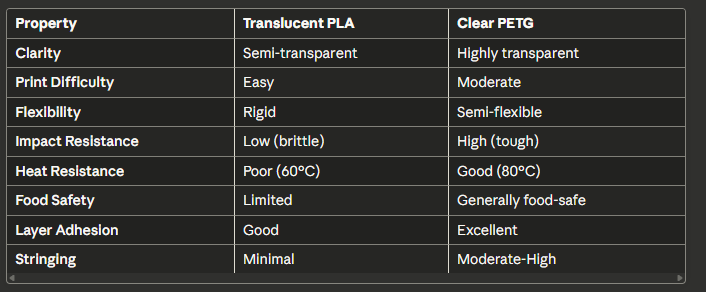
Historical Note: PETG was not widely available during the 2007-2012 Bits From Bytes era. Translucent PLA represented the primary transparent material option for desktop 3D printing during this period.
Storage and Handling
Moisture Management
Hygroscopic Nature:
PLA absorbs atmospheric moisture, with translucent variants showing defects more prominently than opaque materials due to light scattering through water-induced bubbles.
Signs of Moisture Contamination:
- Popping or crackling sounds during extrusion
- Excessive stringing between features
- Cloudy or hazy appearance in printed parts
- Brittle prints that snap easily
- Bubbled or rough surface texture
- Reduced transparency compared to fresh filament
Proper Storage:
Short-term (Active Use):
- Sealed bag with desiccant packs
- Remove only for printing sessions
- Reseal immediately after use
- Replace desiccant every 2-3 months
Long-term (Archive Storage):
- Vacuum-sealed bags with large desiccant packs
- Climate-controlled storage area (20-25°C)
- Away from direct sunlight
- Check seal integrity every 6 months
Drying Procedures:
Food Dehydrator Method (Recommended):
- Temperature: 40-50°C (104-122°F)
- Duration: 4-6 hours for typical moisture absorption
- Placement: Spool on supports for air circulation
- Verification: Test print should show no popping sounds
Oven Drying Method (Use Caution):
- Temperature: 40-45°C (104-113°F) maximum
- Duration: 3-4 hours
- Monitoring: Check every 30 minutes to prevent overheating
- Risk: Oven temperature accuracy critical (PLA softens at 60°C)
Filament Dry Box:
- Continuous desiccant exposure during storage
- Some models allow printing while stored in box
- Investment: $40-80 for quality units
- Benefit: Prevents moisture absorption between sessions
Color Preservation
UV Protection:
Translucent PLA colors can fade or yellow with UV exposure:
Storage Recommendations:
- Opaque containers or bags blocking light
- Interior storage away from windows
- Dark storage areas preferred
Printed Part Protection:
- UV-protective clear coat for displayed pieces
- Avoid direct sunlight placement for permanent installations
- Consider UV-absorbing glass for framed displays
Temperature Stability:
While PLA remains stable at room temperature, excessive heat accelerates aging:
Storage Temperature:
- Optimal: 15-25°C (59-77°F)
- Avoid: Areas near heat sources, attics, vehicles
- Concern: Sustained temperatures above 40°C cause dimensional changes
Troubleshooting Guide
Poor Transparency or Cloudiness
Possible Causes:
- Moisture contamination in filament
- Insufficient cooling during printing
- Nozzle temperature too high (causing slight discoloration)
- Too-rapid print speed preventing proper layer bonding
Solutions:
- Dry filament at 40-50°C for 4-6 hours
- Increase part cooling fan to 80-100%
- Reduce nozzle temperature by 5°C (test 200-205°C range)
- Slow perimeter speed to 40-50mm/s
- Use thinner layer heights (0.1-0.15mm)
Excessive Layer Line Visibility
Possible Causes:
- Layer height too large for desired clarity
- Insufficient cooling creating rough top surfaces
- Print orientation exposing maximum layer count
Solutions:
- Reduce layer height to 0.1-0.15mm for display pieces
- Enable maximum part cooling (100% fan speed)
- Reorient part to minimize layers perpendicular to viewing direction
- Consider post-processing with sanding and polishing
Stringing and Oozing
Possible Causes:
- Retraction settings insufficient
- Nozzle temperature too high
- Moisture in filament causing pressure buildup
- Travel moves too slow
Solutions:
- Increase retraction distance (test 3-5mm range)
- Reduce nozzle temperature by 5-10°C
- Dry filament thoroughly before printing
- Increase travel speed to 150-200mm/s
- Enable Z-hop for travel moves (0.2-0.4mm)
Yellowing or Discoloration
Possible Causes:
- Nozzle temperature excessive (>215°C)
- Material dwelling in hot end too long
- UV exposure after printing
- Contamination from previous materials in nozzle
Solutions:
- Reduce nozzle temperature to 200-205°C
- Clean nozzle with cold pull or cleaning filament
- Avoid sustained temperatures above 210°C
- Protect finished prints from UV exposure
- Store filament away from direct sunlight
Brittle Prints Breaking Easily
Possible Causes:
- Moisture absorption reducing material integrity
- Under-extrusion creating weak layers
- Nozzle temperature too low for proper bonding
- Aging filament (stored > 2 years)
Solutions:
- Dry filament at 40-50°C for 4-6 hours
- Increase extrusion multiplier by 2-5%
- Raise nozzle temperature by 5-10°C
- Verify filament diameter consistency
- Consider replacing old filament stock
Frequently Asked Questions
How transparent can I make 3D printed parts with translucent PLA?
Translucent PLA achieves semi-transparency rather than crystal clarity. Thin sections (1-2mm) allow significant light passage and silhouette visibility, while thicker sections (5mm+) appear more opaque. Maximum clarity is achieved with 0.1mm layer heights, optimal cooling, and extensive post-processing (sanding to 2000+ grit, polishing). Even with best practices, expect 30-60% light transmission compared to injection-molded acrylic. For applications requiring maximum clarity, consider PETG or acrylic alternatives, though these weren’t widely available in the 2007-2012 BfB era.
Can I use translucent PLA for outdoor applications?
Translucent PLA is not recommended for outdoor use without protection. UV radiation causes PLA to degrade, resulting in yellowing, brittleness, and eventual structural failure within 6-12 months of outdoor exposure. If outdoor use is necessary, apply multiple coats of UV-protective clear coating designed for plastics. Even with protection, expect reduced lifespan compared to indoor applications. For permanent outdoor installations, consider UV-resistant materials like ASA or appropriately treated ABS.
Why do my translucent PLA prints show more stringing than solid colors?
Stringing appears more prominent on translucent materials because light scatters through the fine plastic threads, making them highly visible. The material itself doesn’t string more than opaque PLA – the defects are simply more apparent. Solutions include optimizing retraction settings (start with 3mm distance, 60mm/s speed), reducing nozzle temperature by 5°C, drying filament thoroughly, and enabling Z-hop for travel moves. Many users accept minimal stringing on translucent parts as removing threads post-print is straightforward.
How do I maximize light transmission through my translucent prints?
Maximize transparency by using thinnest practical layer height (0.1-0.15mm), printing at optimal temperature (205-210°C), employing maximum part cooling (100% fan), using minimal or zero infill for hollow designs, orienting parts to minimize layers between light source and viewer, and post-processing with progressive sanding (120 to 2000+ grit) followed by plastic polishing compound. For ultimate clarity, some users apply thin epoxy clear coating creating glass-like surfaces, though this requires practice to avoid bubbles.
Can I combine translucent and solid colors in one print?
Yes, multi-material printing with translucent and opaque PLA creates striking visual effects. With dual-extrusion printers like the RapMan 3.2, users created prints with opaque structural components and translucent decorative elements, or embedded opaque patterns within translucent shells. For single-nozzle printers, manual filament changes at specific layers achieve similar effects. Ensure both materials print at similar temperatures (200-210°C for most PLA variants) to avoid thermal management challenges.
Does translucent PLA require different print settings than solid colors?
Print parameters are nearly identical to solid color PLA, with one critical difference: part cooling. Translucent PLA benefits from maximum cooling (80-100% fan speed) to achieve best clarity, while some solid colors might use reduced cooling. All other settings (temperature 200-210°C, bed temperature 50-60°C, print speed 40-80mm/s) remain consistent across PLA variants. The primary difference is visual – defects like stringing and layer lines more visible on translucent materials, demanding tighter quality control.
How do I prevent yellowing in my translucent PLA prints?
Yellowing results from two sources: excessive heat during printing, or UV exposure afterward. During printing, avoid temperatures above 215°C and minimize material dwelling time in hot end. After printing, store parts away from direct sunlight and consider applying UV-protective clear coat for displayed pieces. Some yellowing is natural PLA aging; prints stored properly in dark, cool conditions maintain color for years, while those in sunny windows yellow within months.
What layer height should I use for maximum clarity?
For display pieces where transparency is critical, use 0.1mm layer heights despite dramatically increased print time. This creates smoothest internal light refraction with minimal scattering. For functional parts where some transparency acceptable, 0.15mm layers offer good balance of clarity and reasonable print duration. Standard 0.2mm layers work for rapid prototyping where transparency is secondary consideration. Avoid 0.3mm+ layers unless transparency unimportant – layer lines will be very prominent when backlit.
Related Materials and Resources
Material Guides:
- 3D Printing Materials Catalog – Complete materials overview
- PLA Material Solid Colours – Opaque PLA alternatives
- ABS Material Coloured – Higher heat resistance option
- ABS Material White – Professional ABS filament
Printer Documentation:
- RapMan 3.1 3D Printer – Hardware for translucent materials
- RapMan 3.2 Kit – Dual extrusion capabilities
- Complete BfB Wiki Archive – Full historical documentation
Technical Resources:
- Skeinforge Guide – Slicing software optimization
- Skeinforge Infill Advanced Settings – Parameter tuning for clarity
- G-Code Reference – Understanding print commands
- Teaching Resources – Educational applications
For questions about translucent PLA materials, maximizing clarity, lighting applications, or sourcing compatible filament for vintage equipment, visit our main documentation hub.
This article preserves historical knowledge about Bits From Bytes translucent PLA materials from 2007-2012. Modern safety standards and best practices should be applied when working with any thermoplastic materials. Material specifications represent period-accurate information and may not reflect current formulations or modern alternatives like PETG.
Last updated: November 2025 | Part of the Bits From Bytes Historical Documentation Project


