
![Endpoint Security Software 2026: Enterprise Solutions Compared [Buyer's Guide]](https://bitsfrombytes.com/wp-content/uploads/2026/04/endpoint-security-software-2026-complete-guide-110x110.webp)


Historical Archive from Bits From Bytes Wiki (2008-2012)
⚠️ Historical Archive Notice
This page preserves the original Skeinforge documentation from the Bits From Bytes wiki (2008-2012). Skeinforge was the pioneering open-source slicing software for 3D printing, used extensively by the RepRap and Maker communities before modern tools like Cura and PrusaSlicer.
This is a historical reference. For current 3D printing software, see our modern recommendations below.
Table of Contents
- What is Skeinforge?
- Requirements
- Where to Get It
- File Formats
- Installation
- How to Use
- Settings Overview
- Tools & Features
- Modern Alternatives (2025)
What is Skeinforge? {#what}
Skeinforge is a tool chain composed of Python scripts that converts your 3D model into G-Code instructions for RepRap, MakerBot, and other RepRap-derivative machines.
Developed by Enrique Perez (Fabmetheus), Skeinforge was revolutionary because it was:
- Open source and free
- Highly configurable with dozens of parameters
- Cross-platform (Python-based)
- Extensible with plugin architecture
Between 2008-2012, Skeinforge was the standard for 3D printing slicing, before being superseded by Slic3r, Cura, and other modern alternatives.
Requirements {#requirements}
Skeinforge is written in Python. To use it you need:
Essential:
- Python 2.x or later (Download Python)
- Tkinter (usually included with Python)
- Psyco (optional but recommended – makes Skeinforge run ~2x faster)
Note:
The Python Imaging Library (PIL) is no longer needed in recent versions.
Where to Get It {#where-to-get}
Official Sources (Historical):
- New File Storage (downloading skeinforge) – Archive available
- RSS Feed – Historical feed available
- Fabmetheus Blog by Enrique – Creator’s blog (archived)
- Skeinforge Forum – Previous community forum
- Axiom – “Night build” version (use at your own risk)
Current Archive:
- GitHub Repository: github.com/bmander/skeinforge – Community-maintained archive with full history
File Formats {#file-formats}
Skeinforge accepts and generates the following formats:
Input Formats:
- G-Code – CNC Triangulated Surfaces
- STL – Standard Tessellation Language (most common 3D format)
- OBJ – Wavefront 3D Object format
- SVG – Scalable Vector Graphics
- XML – Extensible Markup Language
Output:
- G-Code – Machine instructions for your 3D printer
Installation {#installation}
Simple Installation Guide:
Step 1: Install Python Download and install Python 2.x from python.org. The installer usually includes everything you need.
Step 2: Install Psyco (Optional) For 2x speed improvement, download Psyco from the Psyco Download page.
Step 3: Download Skeinforge Get the latest version from the GitHub repository or download the archived release.
Step 4: Extract & Run Unzip Skeinforge to a folder. Double-click skeinforge.py or run from command line:
bash
python skeinforge.py file.stlThat’s it! Skeinforge should launch with its GUI.
How to Use {#how-to-use}
Running Skeinforge
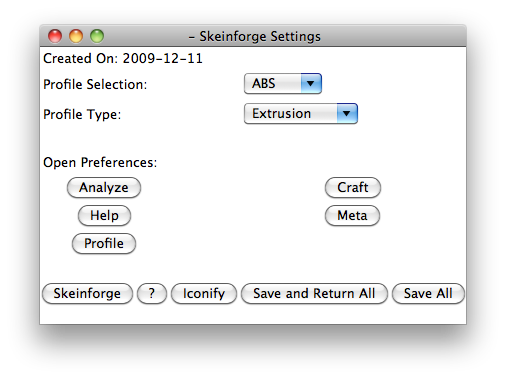
When Skeinforge starts, three windows appear:
- Shell window (black) – Shows progress, which parts executed, errors, etc.
- Preferences window – Main control panel
- Profile preferences window – Machine and material settings
Basic Workflow:
Step 1: Set Your Profile In “Profile Preferences” window, click “Extrusion” button and select:
- Profile for machine: RapMan (or your printer)
- Material: ABS, PLA, etc.
- Click “Save Preferences”
Step 2: Adjust Craft Settings In “Skeinforge Preferences” window, click “Craft”. Adjust settings like:
- Raft
- Fill
- Speed
- Cool
- etc.
Step 3: Generate G-Code Click “Craft” button at the bottom → Browse to your STL file → Click “Open”
The shell window displays progress. When done, G-code file is saved in the same folder as your original STL file.
Step 4: Optional Analysis If “Analyze Preferences/Statistic/Save Statistics” is selected, Skeinforge creates a statistics file with info about the print.
Running from Command Line:
To craft a single file:
bash
python skeinforge.py file.stlTo run on multiple files (Linux):
bash
for file in ./objects/*.stl do ; python skeinforge.py $(file) ; doneSettings Overview {#settings}
Skeinforge has extensive configuration options grouped into categories:
Craft Settings
The main tools for slicing. Each can be enabled/disabled:
- Carve – Most important plugin to define your extruder
- Chamber – Control bed and chamber temperature
- Clip – Clips the ends of loops to prevent bumps
- Comb – Move extruder around inside holes intelligently
- Cool – Make pause between layers if they are small
- Dimension – 5D option for skeinforge (not supported by RapMan)
- Export – Final touch to file before it’s saved
- Fill – What to fill the object with
- Fillet – Rounds the corners slightly
- Home – Positioning settings
- Hop – Lift head between layers
- Inset – Inner wall settings
- Jitter – Change where every layer starts to prevent ridge on side
- Lash – Not used by RapMan (compensates for backlash)
- Multiply – Create an array of objects
- Oozebane – Control oozing
- Preface – General settings (units, start/end files)
- Raft – Support and raft settings (critical for adhesion)
- Speed – Speed panel: extrusion speed, head movement speed
- Splodge – Turn on extruder “a bit earlier”
- Stretch – Compensate for the fact that holes are smaller than they should be
- Tower – Ooze tower settings
- Unpause – Unpause settings
- Widen – Widen walls which are less than a double perimeter width wide
- Wipe – Describe your wipe procedure
Meta Settings
- Description – Description of your profile
- Polyfile – Directory or file choice
Profile Settings
Here you can select a standard profile and open the various subsections:
- Craft Types: Cutting, Extrusion, Milling
- Each has specific settings for that craft type
Tools & Features {#tools}
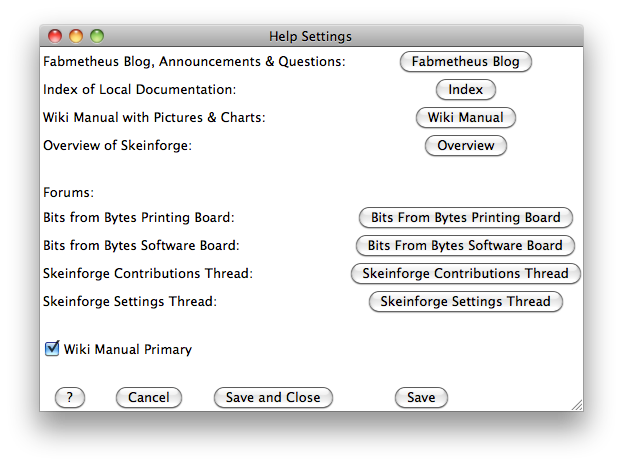
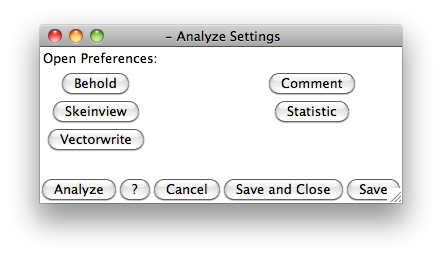
Analyze Tools
Tools to help analyze the output:
Behold
- 3D view of the part (as of 2009)
- Shows G-Code visualization
Skeinview
- Layer (2D) view of the output
- Most useful for previewing prints
Vectorwrite
- SVG export of each layer
Comment
- Add comments to the G-Code
Statistic
- Statistics about the print (time, material usage)
Troubleshooting
If there’s a bug, try:
- Download the very latest version (Skeinforge is often updated)
- File a bug report with:
.stlfile- Pictures explaining the problem
- Your settings (zip the whole
.skeinforgedirectory with all your settings)
Then zip all files and email to: pierce_enrique AT yahoo.com (remove _enrique)
After a bug fix is released, test the new version and report results to Enrique whether the fix was successful or not.
Tutorials & Resources
Original Tutorials (Historical):
From Enrique and the community:
- Allan Ecker aka The Masked Retriever’s “Skeinforge Quickie: Cool”
- Allan Ecker “Skeinforge Quickie: Fill”
- Allan Ecker “Skeinforge Quickie: The Raft, Part 1”
- Allan Ecker “Skeinforge Quickie: The Raft, Part II”
- Cliff Biffle “Skeinforge Quick Tip: Tweaking the Speed Knob”
- Markus Kayser’s extrusion width and layer thickness tutorial
- Nick Ames’s Skeinforge Tutorial
- Tony’s Baer for potential printer problems
- Tony’s google reference
- Tony’s list of skeinforge settings
- Tony’s “More Skeinforge” post on the BfB Blog
- RapMan Blogspot – More Skeinforge
Community Resources:
- Fabmetheus Blog – Enrique’s original blog
- Skeinforge powwow page of the RepRap Forum – Discussion archives
With thanks to all the above and Enrique (from the skeinforge powwow page of the RepRap Forum).
Note: Skeinforge has moved! Enrique has a Blog for discussion of all things related to Skeinforge: Fabmetheus Blog
Modern Alternatives (2025) {#modern-alternatives}
While Skeinforge was revolutionary and paved the way for modern 3D printing, today’s slicing software has evolved significantly.
Recommended Modern Slicers:
🥇 PrusaSlicer (Free, Open Source)
- Based on Slic3r, heavily developed by Prusa Research
- Excellent profiles for many printers
- Regular updates and active community
- Download PrusaSlicer
🥇 Cura (Free, Open Source)
- By Ultimaker, most popular slicer today
- User-friendly interface
- Great for beginners and experts
- Download Cura
🥈 SuperSlicer (Free, Open Source)
- Fork of PrusaSlicer with extra features
- Very powerful and configurable
- Download SuperSlicer
💰 Simplify3D (Commercial, ~$150)
- Professional-grade slicer
- Excellent support generation
- Advanced features
- Simplify3D Website
🆕 OrcaSlicer (Free, Open Source)
- Modern fork of PrusaSlicer/SuperSlicer
- Optimized for Bambu Lab printers but works with others
- Cutting-edge features
- Download OrcaSlicer
Why Skeinforge Still Matters
Historical Significance
Skeinforge was groundbreaking because it:
- Democratized 3D printing – First truly accessible, free slicing software
- Pioneered key features – Raft generation, infill patterns, support structures
- Enabled the RepRap movement – Made DIY 3D printing practical
- Open source philosophy – Inspired all modern slicers
Educational Value
Studying Skeinforge helps understand:
- How slicing works fundamentally
- G-code generation from 3D models
- Print parameter relationships (speed, temperature, quality)
- The evolution of 3D printing technology
Community Legacy
The Skeinforge community created:
- Extensive documentation and tutorials
- Parameter optimization research
- Troubleshooting knowledge base
- Foundation for modern 3D printing practices
Related Resources
On This Site:
- G-Code Reference Guide – Understanding G-code commands
- 3D Printing Materials Guide – Historical BFB materials documentation
- RapMan 3D Printer Archives – Original RapMan documentation
- Teaching Resources – Using 3D printing in education
- BFB Historical Archive – Complete Bits From Bytes history
External Resources:
- RepRap Wiki – Community documentation
- GitHub – Skeinforge – Source code archive
- r/3Dprinting – Modern 3D printing community
- r/RepRap – RepRap community
About This Archive
This page is part of the Bits From Bytes Historical Archive Project, preserving important documentation from the early days of consumer 3D printing (2007-2012).
Bits From Bytes was a pioneering company in desktop 3D printing, founded in 2007. The company:
- Created the RapMan and 3DTouch 3D printers
- Built extensive community resources and documentation
- Was acquired by 3D Systems in 2010
- Helped establish the foundation of today’s maker movement
Preservation Status:
- ✅ Original content restored from Wayback Machine archives (2011-2012)
- ✅ Updated with modern context and recommendations (2025)
- ✅ Links verified or noted as archived
- ✅ Community contributions welcomed
Contribute
Found errors or have additional historical information?
We welcome contributions to improve this historical archive:
- Corrections to technical details
- Additional screenshots or documentation
- Personal experiences with Skeinforge
- Links to related resources
Contact us or submit via GitHub
Metadata
Original Publication: 2008-2010 (Fabmetheus/Enrique Perez)
Wiki Version: 2010-2012 (Bits From Bytes Wiki)
Archive Date: October 2025
Archive Maintainer: Bits From Bytes Historical Project
License: Historical documentation – original licenses respected
Last Updated: October 28, 2025
Status: Complete restoration with modern updates
Page Views (Historical): 36,292 times (as of August 24, 2011)
This archived documentation represents the collective knowledge of the early 3D printing community. While the software may be outdated, the principles and history remain valuable for understanding how modern 3D printing evolved.
For modern 3D printing guidance, see our current blog posts.


